这篇主要看 Torch CUDA 部分,对应源码目录aten/src/THC,里面包含了许多C++和CUDA代码。这部分实现了操作 THCTensor 和 THCStorage 的接口,不过底层用的数据结构还是TensorImpl和StorageImpl。THC里的接口也是通过C语言范式实现的,但是Apply系列操作不再由宏来实现,而是使用了C++模板。其他的区别还有allocator不同,以及多了 THCState 结构。
记号:
- TH = TorcH
- THC = TorcH Cuda
目录
THCState
通过观察THC里面实现的接口不难发现,几乎每个接口都需要传入一个THCState*参数,而这是在TH中没有的,这个THCState的声明在THCGeneral.hpp中:
1 | struct THCState { |
THCState是一个全局CUDA状态,记录了CUDA设备的所有有用的信息,它的初始化在THCGeneral.cpp中,代码并不难理解。
注 host和device:在CUDA编程中,host 指的是CPU和它的内存,而 device 指GPU及其显存。在 host 上运行的代码可以操控内存和显存,还可以启动 kernels 在GPU上计算。因为CUDA编程的这些特性,一个典型CUDA程序的执行过程为:
分配内存和显存空间
初始化内存数据(host)
把数据从内存 (host) 传送到显存 (device)
执行 kernels
把结果从显存 (device) 传回内存 (host)
THCAllocator
THCCachingAllocator
查看THCState初始化的代码不难发现,显存分配器cudaDeviceAllocator的类型为CudaCachingAllocator,它的实现在c10/cuda/CUDACachingAllocator.cpp中。进一步观察后发现,CudaCachingAllocator调用的分配内存函数实际上是THCCachingAllocator实现的,THCCachingAllocator不光向系统请求分配显存,还实现了缓存管理系统,我们主要来看一下THCCachingAllocator的实现。
首先声明一个内存区块的结构体,里面存储设备、stream、区块大小等信息:
1 | struct Block { |
为了方便比较查找,为Block定义比较大小的方法:
1 | static bool BlockComparator(const Block* a, const Block* b) |
使用此比较函数的话Block(device, NULL, 0)就是设备device上区块大小的下限,而Block(device + 1, NULL, 0)则是设备device上的区块大小上限。
接下来看THCCachingAllocator定义的属性:
1 | struct THCCachingAllocator |
每个属性是干什么的注释已经写的很清楚了,注意到FreeBlocks类型是Block的有序集合,曾经分配过但是用完了的内存会被缓存起来,大于1M的分块会进入large_blocks,小于等于1M的分块进入small_blocks。之后再向分配器申请内存时会先从缓存里面分配,分配策略为Best-fit,即返回大于等于所需大小的最小分块(使用set::lower_bound实现)。如果缓存中的所有分块都小于目标大小,那么会尝试cudaMalloc分配目标大小的内存,如果还是失败的话就把缓存release了再试cudaMalloc,如果还是分配失败就会报内(显)存不足的错误。
如果上面某一步分配内存成功了,由于分配的块很有可能比实际需要的size大,所以还要进行切割操作。切割操作就是判断多余的大小是否大于1M,如果大于1M就插入到large_blocks,否则插入到small_blocks中,然后再设置一下prev和next指针即可。
分配内存的(简略)实现如下:
1 | /** |
释放内存的时候不会把内存直接还给系统,而是缓存起来根据块大小插入large_blocks或small_blocks,在插入之前还会检查能否和之前被切割的部分合并。
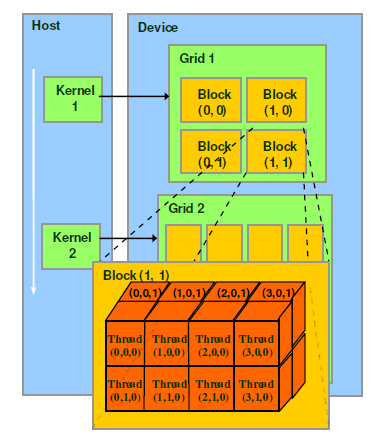
注 CUDA架构:从硬件上看,CUDA设备含有 SP (Streaming Processor) 和 SM (Streaming Multiprocessor);从软件上看,有 thread, block, grid, 和 warp 等概念。
SP:最基本的处理单元,最后具体的指令都是在SP上处理的。
SM:多个SP加上其他资源,如:warp scheduler, register, shared memory等组成的大核,相当于CPU的核心。
thread:普通的线程,运行在SP上。
block:多个线程会组成一个block,同一个block中的线程可以通过shared memory通信。同一个block中的线程在同一个SM中执行。
grid:多个block构成一个grid。
warp:调度和运行的基本单元,包含多个线程。每个线程执行相同指令,但是数据不同(SIMT)。一个warp需要占用一个SM运行,多个warps需要轮流进入SM。
stream:一个GPU操作队列,该队列中的操作将以添加到流中的先后顺序而依次执行。
THCCachingHostAllocator
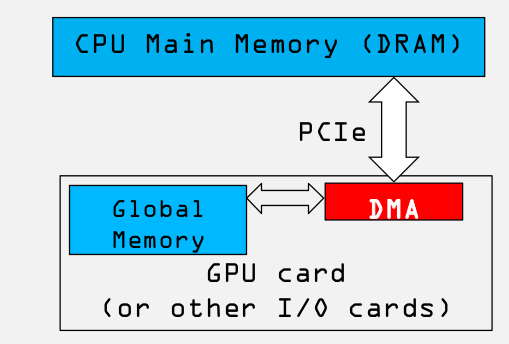
THCState中还有一个内存分配器cudaHostAllocator用来分配main memory,这个分配器指针指向HostAllocator,实现在aten/src/THC/THCCachingHostAllocator.cpp中。这个分配器的实现和上面的类似,也提供了缓存功能。值得注意的是,它向系统分配内存是用的cudaHostAlloc()函数,这是cuda库函数,它与malloc()不同。malloc()分配的标准的、可分页的主机内存,而cudaHostAlloc()分配的是页锁定的主机内存,也称作固定内存 (pinned memory)。它的一个重要特点是操作系统将不会对这块内存分页并交换到磁盘上,从而保证了内存始终驻留在物理内存中。由于GPU知道内存的物理地址,因此就可以使用DMA技术来在GPU和CPU之间复制数据,加快复制速度。
THCApply
和TH中一样,THC也有Apply系列函数,不同的是THC中的Apply不再用宏实现,而是用C++模板函数实现,代码在src/THC/THCApply.cuh。
首先来看直接运行在GPU上的kernel的实现:
1 | template <typename Op, |
上面的kernel实现了对Tensor的一元操作,也就是对Tensor中的每一个都数据都执行op操作,二元和三元操作与一元操作代码类似,就不列出了。这段理解起来不难,只有三点需要特殊说明一下:
函数对象
模板参数中的Op是函数对象类型,它实现了operator()方法,这样的话它的实例对象就可以直接当函数来用,如:
1 | struct IntComparator |
这就是一个很常用的用来比较整数大小的函数对象类型,它可以这样用:
1 | IntComparator op; |
函数对象类似于函数指针,但有两个优点:第一是编译器可以内联执行函数对象的调用;第二是函数对象内部可以保持状态。
循环下标
循环的下标每次增加gridDim.x * blockDim.x,而不是通常的1,这就涉及到kernel是如何执行的了。首先kernel被分配到多个Grid上执行,每个Grid里有多个Block,每个Block里有多个Thread,这些线程(Thread)都执行相同的代码,也就是kernel。为了让这些线程分工合作,每个线程都记录了gridDim blockDim,blockIdx, 和threadIdx,分别代表Grid维度,Block维度,Block ID,和Thread ID。在这里,Grid和Block都是一维的,所以当前线程的全局ID可以通过
1 | blockIdx.x * blockDim.x + threadIdx.x |
得到,其中blockIdx.x表示第几个Block,blockDim.x是一个Block内有多少线程,threadIdx.x是该线程在Block内的ID。
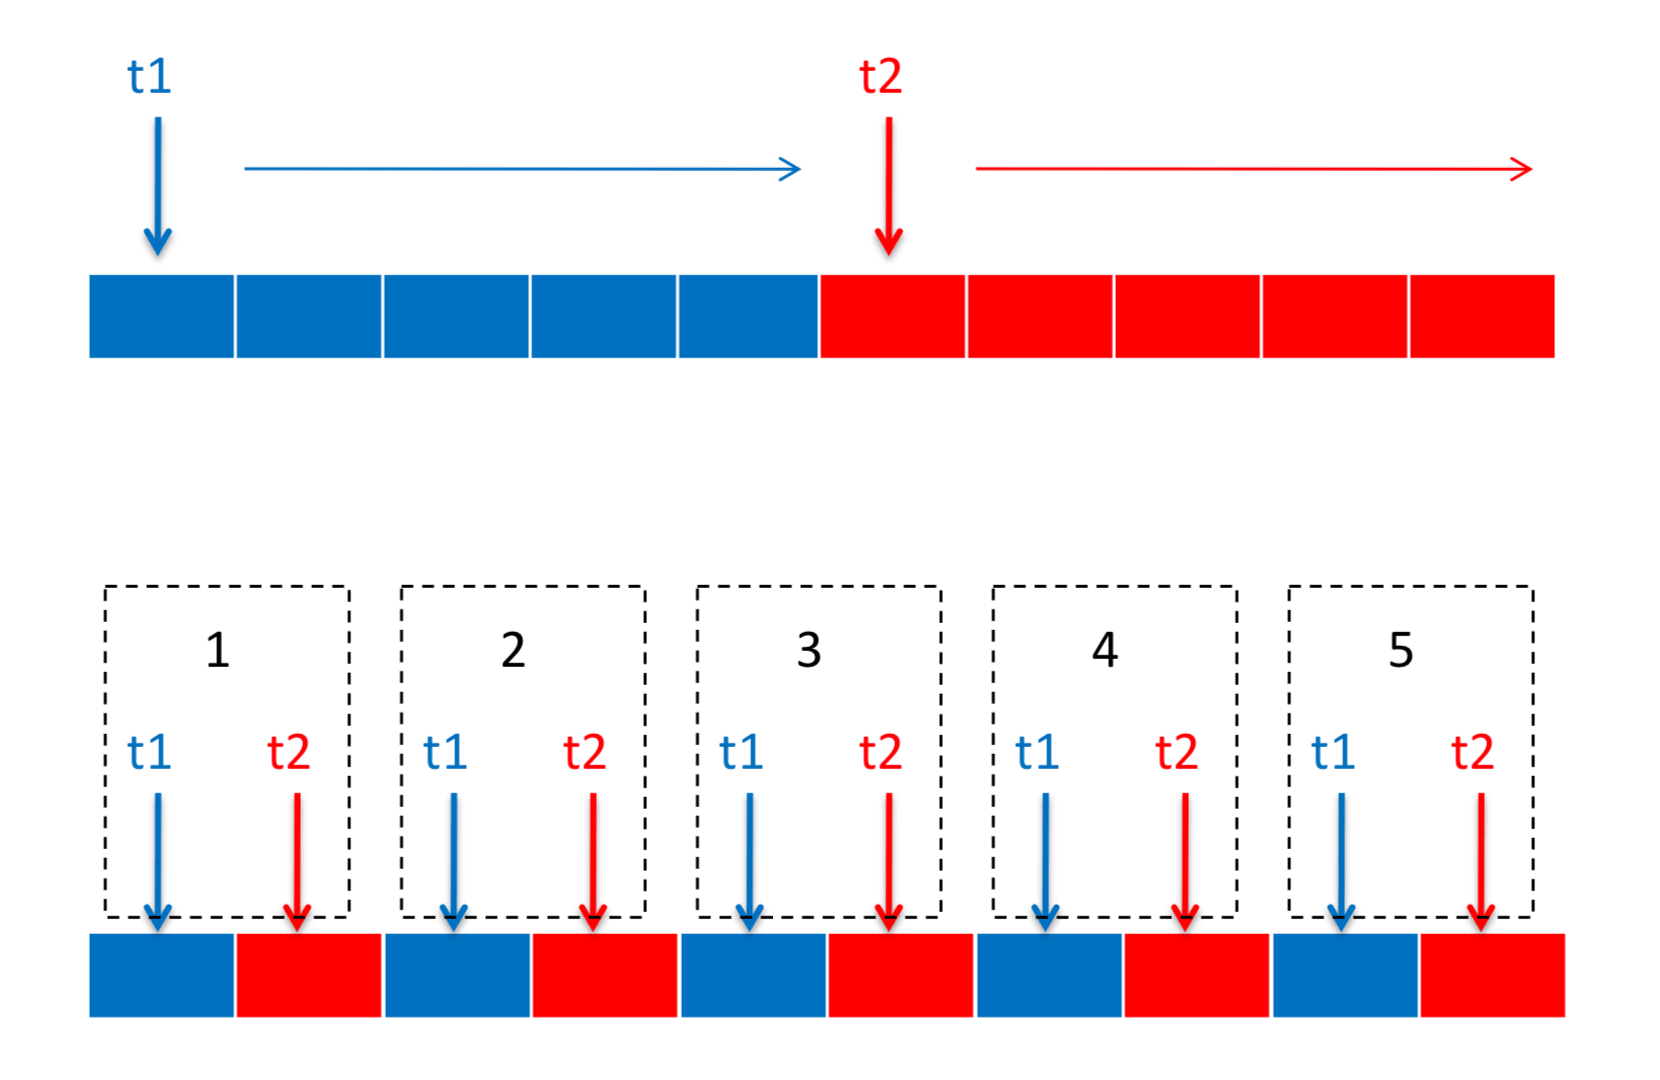
再看下标递增的间隔gridDim.x * blockDim.x实际上是执行这个kernel的线程个数,即一个Grid内的Block数 \(\times\) 一个Block内线程数。这样的好处是,如果不同线程要读取的内存是连续的,则这些内存读取可以捆绑到一起进行,加快了内存读取速度,如下图。
OffsetInfo
注意到循环体里只有一句代码:
1 | op(a.get(linearIndex)); |
意思对第linearIndex个数据进行op操作。由于linearIndex是线性地址,并不是数据真正的内存偏移,所以 a.get()的作用是把线性地址转换为实际数据的存储地址,而a的类型是OffsetInfo<Ta, IndexType, Dims>。
转换的算法其实很简单,线性地址就是第几个数据,比如x[0][0]是第0个数据,线性地址就是0,x[0][1]的线性地址就是1,x[i][j]的线性地址就是i * size[0] + j。而且我们知道x[i][j]的内存偏移为i * strides[0] + j * strides[1],那么转换算法要做的就是把线性地址转换为ijk下标,然后再把下标转化为内存地址:
1 | template <typename T, typename IndexType> |
细心的读者可能注意到了,上面的函数是IndexToOffset的方法,并不是OffsetInfo的,实际上后者对非负整数除法和取余进行了优化,把除法转换为一系列乘法,从而加快计算速度。
大致思想是这样的,假设我们要计算 \(\lfloor\frac{n}{d}\rfloor\),对任意N位非负整数\(d\),总可以找到一个 magic number \(m\) 和 \(s\),使得: \[ \lfloor\frac{n}{d}\rfloor=\lfloor\frac{m\times n}{2^{N+s}}\rfloor \] 这样就把除法操作转化为乘法和右移了。
那么怎么找 \(m\) 和 \(s\) 呢,非常简单: \[ s=\lceil\log_2 d\rceil \\ m = \lfloor 2^N\times\frac{(2^s-d)}{d}\rfloor+2^N+1 \] 对于固定的除数 \(d\),这两个参数是不会变的,如果需要多次除以 \(d\),则可以提前计算好 \(m\) 和 \(s\),在计算时加快速度。注意到计算 \(m\) 时也是需要除法运算的,所以如果这个除数只用一次的话,那么用快速除法是没意义的(除非\(m\)是在编译期计算的)。关于这个式子的证明和推导看这里。
代码中,OffsetInfo的实现实际上是跟模板参数Dims相关的,如果维度能在编译期给出的话(值非-1),则在生成OffsetInfo对象时计算 \(m\) 和 \(s\),以备之后使用:
1 | template <typename T, typename IndexType, int Dims> |
如果创建OffsetInfo时,Dims的值为-1的话,代表Tensor的大小不是固定的,这样的话OffsetInfo::sizes和OffsetInfo::strides是动态分配的,就会触发NVCC的一个bug:if a kernel argument contains an array that is dynamically accessed, the whole array is first copied into the local memory. Pre-computation makes it worse because now we have more data to copy.
所以对于大小不固定(编译期不能给出具体维度)的Tensor采用之前的办法计算,这里使用了特化模板匹配Dims为-1的情况:
1 | template <typename T, typename IndexType> |
总结
总结一下,THC中的API的声明和实现都在generic目录下,API的形式是C风格范式:THCTensor_(xxx)(...)。这些函数几乎都会调用 apply 系列函数来在GPU中实现具体功能,而 apply 函数的核心在于传入的OP,这些OP都定义在THC/根目录下。
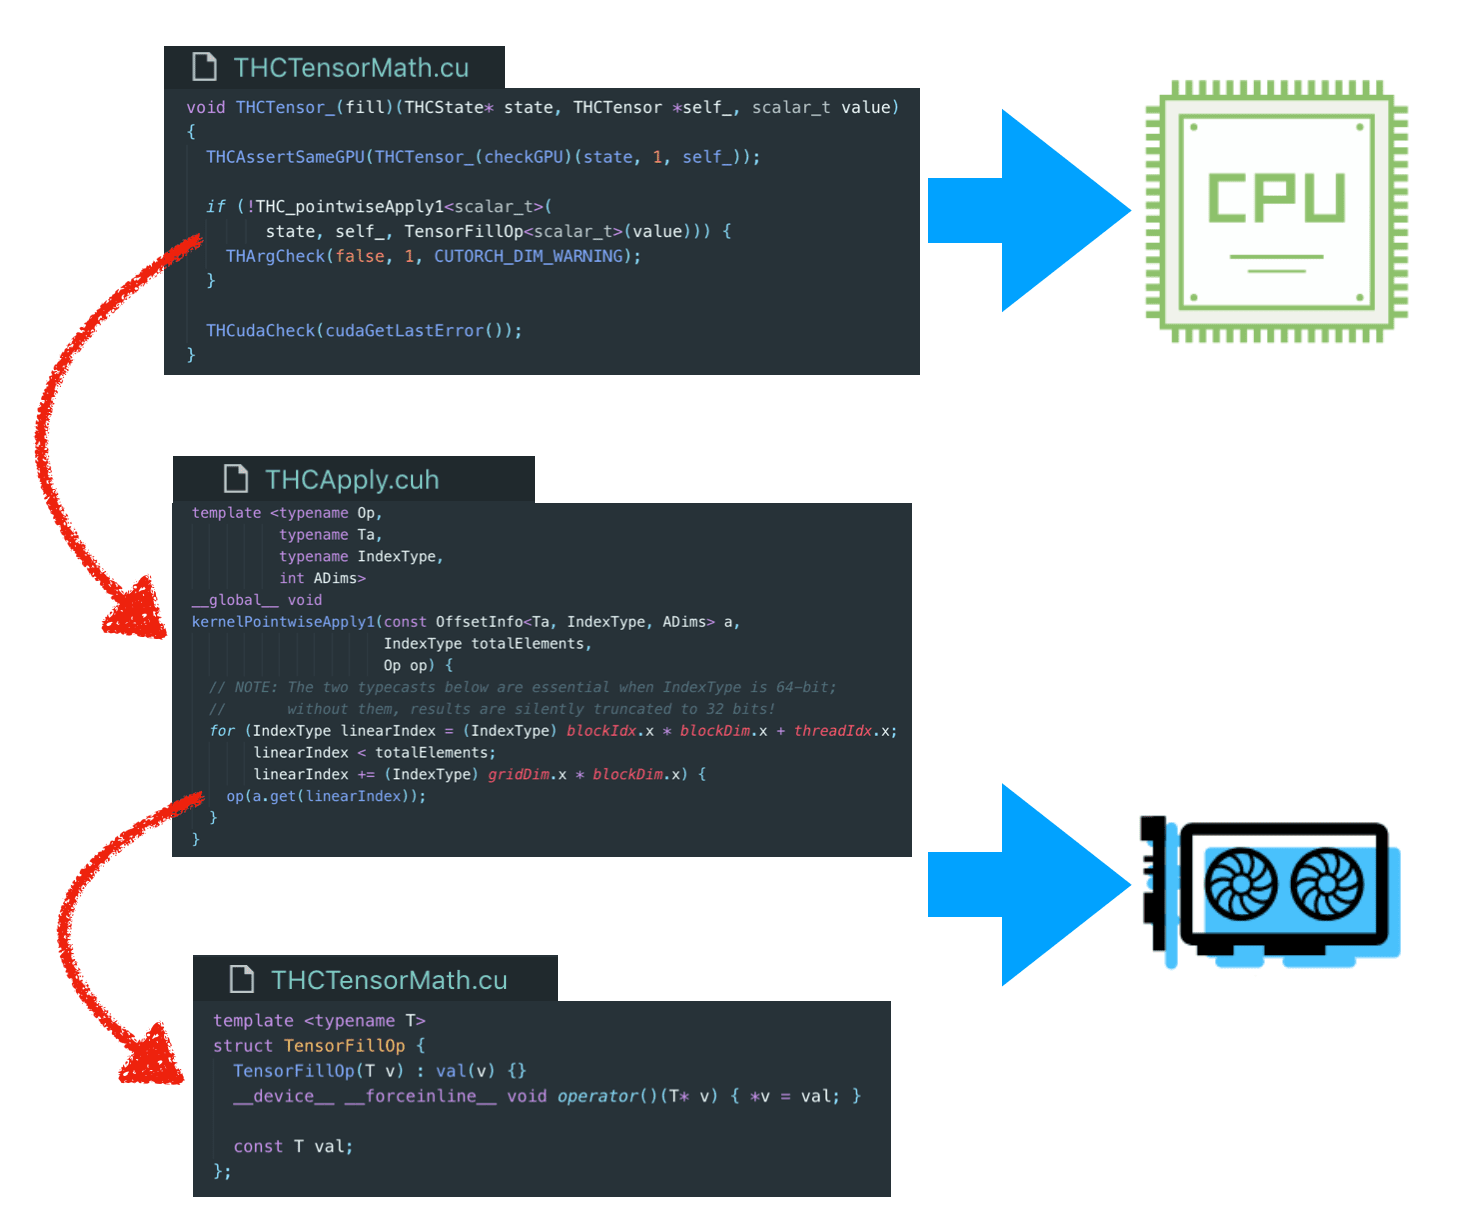
举个例子,来看一下THCTensor_fill(state, self, value)是怎么执行的,它的功能是把self指向的Tensor的每个元素赋值为value。这个API的定义在THC/generic/THCTensorMath.cu:
1 | void THCTensor_(fill)(THCState* state, THCTensor *self_, scalar_t value) |
核心代码为:
1 | THC_pointwiseApply1<scalar_t>(state, self_, TensorFillOp<scalar_t>(value)) |
这句话调用一元 apply 函数,传入的参数为 THCState, 要操作的Tensor和相应OP。THC_pointwiseApply1()会进行一些特殊情况的处理和优化,最后调用之前列出的apply kernel执行相应OP。
TensorFillOp定义在THC/THCTensorMath.cu中,
1 | template <typename T> |
注意到填入Tensor的值被保存为类的常量,而不是作为operator()的参数,这样才能统一接口,才能被kernelPointwiseApply1()直接调用。
调用过程的示意图如下:
つづく
| 上一篇:THTensor | 下一篇:NN |
|---|---|